Advanced Paint Techniques
This section covers some of the more advanced paint techniques used for photosimulation and image retouching. The tools discussed are all in Photoshop. Camera matching is covered at the end of the chapter, the technique shown could be done in any 3D application that displays a background image behind the model
Cut and Paste / Compositing
Cutting and pasting with digital images allows the incorporation of a wide variety of imagery into a visualization. Image data can be taken from third party image sources or photos taken explicitly for source material. Imagery used in photosimulations can include landscape materials, cars and people, materials and finishes, or environmental elements- skies and backgrounds.One issue to keep in mind when selecting source material is the lighting of the original scene. The closer it matches the intended image, the more successful the composite.
Selection Tools
'Cutting out' in Photoshop is actually an area of selection. The primary tool for this is the Lasso selection tool from near the top of the Tools palette.

The Lasso button is a flyout that can set one of three options. The Polygonal Lasso (shown above) is the easiest to use, especially with a mouse. An area is selected in the image with individual mouse clicks, defining points around a polygonal shape, which is closed by touching the beginning point or with a double-click. The points can be as close together as one pixel, so defining any shape is just a matter of zooming in and selecting carefully. Once selection is complete there will be a polygon defined by the 'marching ants'. The selection can now be copied or cut to the clipboard. (Ctrl+C for Copy, Ctrl+X for cut) or EDIT>COPY/CUTfrom the pulldowns. Then when the selected area is pasted into the same image, or a new image (Ctrl+V or EDIT>PASTE), the cut-out is placed on a new layer above the current layer. The new layer can be scaled, rotated or skewed to help the texture better match the context,
Anti-aliasing should usually be checked in the set of options for the Lasso at the top left of the Photoshop

The Feather setting can be set in the options as well, in this case the feather was set to be 2 pixels- the selection will have a soft edge that is 2 pixels wide. A feather can also be applied to the selection using the Selection pulldown menu: SELECT>FEATHER

The advantage of using the Select pulldown is the feather can be undone without undoing the selection
Selections can be saved to a channel for later use using the SELECT>SAVE SELECTION pulldown, they can be named for later recognition, and saved out with .PSD files.
Selection areas are also be used to control where actions take place, even where a copied image is pasted into the new layer. In the screen capture below, two stone surface texture samples have been pasted in on a layer above the existing view of a proposed cut slope. The selection visible with the 'ants' is the area where the new surface is to be painted in.
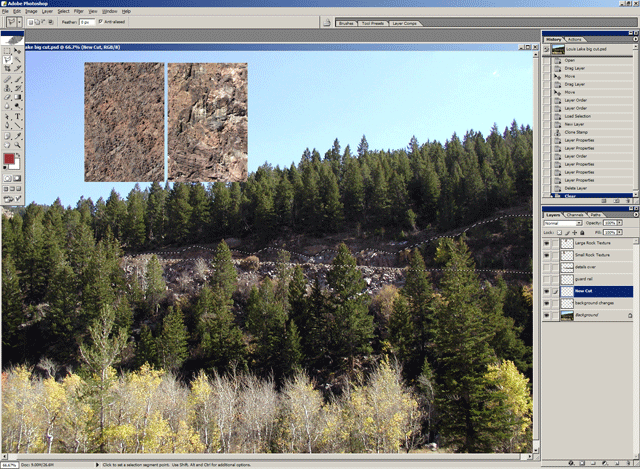
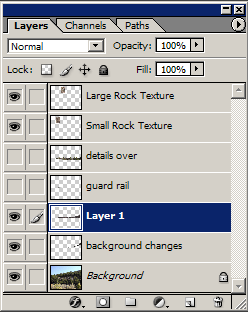
A close up of the Layer palette for this image shows the stone textures on their own separate layers, and the current layer is the selected area for the new cut, it is highlighted and active. Switching to one of the stone layers, cutting out some image data, then pasting into the selection on the layer for the new cut. The stone surface images were scaled to match the intended context, which makes them useful as source material for some of the other tools discussed next.
Selection in Paint Shop Pro
Functionality for most Photoshop tools can be replicated with Paint Shop Pro- the tools have slightly different names. If using Paint Shop Pro, the Freehand Selection Tool works the same way as Lasso, the tool is selected from the Tools toolbar:
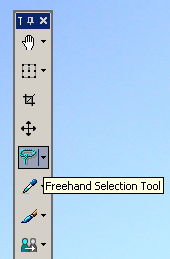
Settings are input on the Tools Palette, which should be at the top left on the bottom of the toolbar area. Point to Point mode is similar to the Polygonal Lasso in Photoshop (except that a selection is completed by right-clicking rather that double-click..). Feather and Anti-aliasing can also be set on this palette:

If it is desirable to Feather the area after selection is done (undo-able), the SELECTIONS>MODIFY>FEATHER command works the same way as in Photoshop.
In Paint Shop Pro, the selection is saved to an Alpha Channel using the Selections Menu: SELECTIONS>LOAD/SAVE SELECTION>SAVE SELECTION TO ALPHA CHANNEL.
Another subtle difference in Paint Shop Pro when pasting copied image data: CTRL+V will create a new image for the pasted data. To paste the cut-out image data into an open image on a new layer (the default in Photoshop), use the EDIT>PASTE>PASTE AS NEW LAYER menu command, or CTRL+L.
Painting in from Source Material
Clone Stamp Tool
While cutting and pasting is effective for large areas, there are some tools that are more useful for small areas and removing some of the 'tiling', or obvious repetition of the source material in the pasted area. The Clone Stamp tool is the most useful for 'painting' from a source image. This tool is on the tool palette:

The default mode is Source mode, the easiest method to use. A target is selected with an Alt+click (you will notice the mouse icon change to a target), and then the tool will paint in source material to the mouse's location in a relative location to the source. The Brush size determines how much an area is painted, the Opacity and Flow controls determined how quickly it fills in.

Check Use All layers to use imagery on layers other than the current layer. In the sample working image above, the two stone surface images could be sourced and painted into the selection area on Layer 1 as long as all layers are being sourced.
Healing Brush Tool
The Healing tool works in a similar way to the Clone tool, except that the source imagery is blended with the destination image to match color and lighting. It is useful for cleaning up areas of image with good source material. For example, oil streaked pavement could be 'cleaned up' by sampling clean pavement from another image.
Clone Brush in Paint Shop Pro
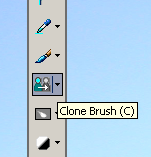
The Clone Brush tool in Paint Shop Pro is similar to the Clone Stamp in Photoshop. The tool is accessed from the Tools toolbar, and setting will be available on the Tool Palette.
|

|

|
Brush Shape, Size, Hardness and Density control the coverage and flow of the Clone effect. Select the Layer for source material and click the mouse while holding Shift to define the source location for clone image data. Check the Sample Merged box to clone data from all Layers. The tool will paint from the source onto the currently selected Layer.
Camera Matching
Camera matching is the process of defining a camera position, target, and field of view that matches an image acquired in the field. Once a camera in a 3D scene matched the camera used for the background image, 3D elements in the model are matched and scaled correctly for the photo. This is the basis for photosimulation- 3D proposed project elements rendered to scale and in the proper perspective for the background photograph. The advantages of photosimulations are that they are very accurate, relatively easy to produce compared to producing a detailed 3D model, and they portray a high level of realism based on the background photo that could never be achieved by a model.
The best start to a camera match is to document as much as possible about the position of the camera in the field, including height above ground, where the camera is pointing, and what many forget to document- what is the focal length of the lens, or field of view (FOV). With zoom lenses, and now digital cameras that don't have the same relationship of FOV to focal length as 35mm cameras, this parameter is often unknown. It isn't as critical when the position of the camera is well documented, but a lot of frustration can come from trying to guess both position and FOV.
Another critical requirement is to have as much existing information in the 3D model as possible, such as existing topo as surfaces, road details, signs or buildings, etc. In many cases, it is beneficial to place targets at known locations in the scene, and then duplicate the targets with 3D elements in the model. Rural scenes typical of FLHD can be some of the more difficult areas in which to get good existing data in the model to match.
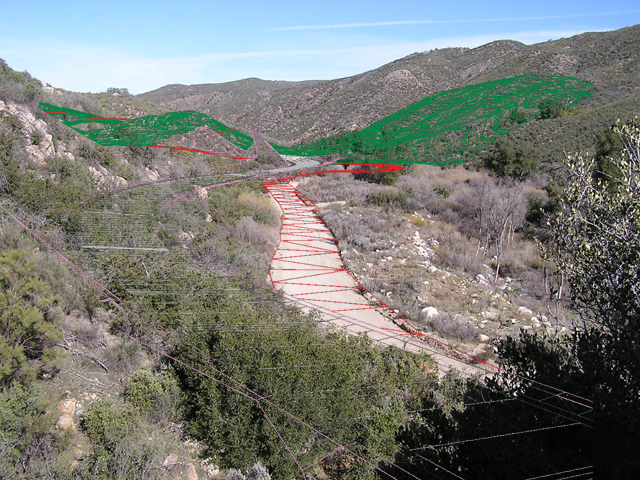
In this image, the DTM for some of the existing slopes is used along with the existing road for a match.
Whether doing the camera match in Microstation or some other 3D application, the process is the same.
Insert the camera as close to its known position as possible, and place target at a location that matches the visible center of the photo. The horizon, defined by the Z-height of the target, is just as important as the X and Y location. Set the zoom, or field of view, to get the overlayed geometry as close to image as possible. It is then a process of systematically tweaking the camera position or FOV in small amounts, and re-orienting the target to align the image. After a while, (hopefully) there will be predictability to the small changes and how they affect the perspective. It is best to change just one parameter at a time- ie. move the camera in or out (dolly), or move it left to right relative to view (camera pan or track), and always re-set the target after each move to as close to center as can be perceived. Try a small zoom in or out, and then dolly the camera to rescale perspective, again in small amounts. It is as much an art as a science, and takes some practice.
With Microstation, the best way to get predictable results is to create a fixed-size viewport at the same aspect as the background photo, define a camera in that viewport, and use the navigation tools and camera settings to step through the process.
Cropped Images
It is important to note that background images should never be cropped off-center before doing a camera match. As soon as the image is cropped the perspective is altered from the true three-point perspective of the original photo, and the match will never be exact.
